Ceci est une ancienne révision du document !
Déploiement Springboot
Via Gitlab CI/CD
Mise en place du déploiement automatique d'une application Springboot vers un serveur externe (VM mise à disposition) via CI/CD Gitlab.
Configuration VM
Se connecter en root avec su :
su -l
Installer Java
Choisir une version compatible (supérieure ou égale à la verion java déclarée dans le pom.xml):
cd /tmp
wget https://download.oracle.com/java/17/latest/jdk-17_linux-x64_bin.deb
dpkg -i jdk-17_linux-x64_bin.deb
java -version
Installer Tomcat 10
Ajouter un utilisateur tomcat :
useradd -m -d /opt/tomcat -U -s /bin/false tomcat
Télécharger et dézipper Tomcat :
cd /tmp
wget https://dlcdn.apache.org/tomcat/tomcat-10/v10.1.16/bin/apache-tomcat-10.1.16.tar.gz
sudo tar xzvf apache-tomcat-10*tar.gz -C /opt/tomcat --strip-components=1
Définir les permissions sur les fichiers :
chown -R tomcat:tomcat /opt/tomcat/
chmod -R u+x /opt/tomcat/bin
Créer le tomcat-manager pour manager les sites à distance via l'interface web :
nano /opt/tomcat/conf/tomcat-users.xml
<!-- user manager can access only manager section -->
<role rolename="manager-gui" />
<user username="manager" password="_SECRET_PASSWORD_" roles="manager-gui" />

<!-- user admin can access manager and admin section both -->
<role rolename="admin-gui" />
<user username="admin" password="_SECRET_PASSWORD_" roles="manager-gui,admin-gui" />
Créer un service Tomcat
Pour gérer tomcat plus facilement, créer un service Tomcat :
nano /etc/systemd/system/tomcat.service
[Unit]
Description=Tomcat
After=network.target

[Service]
Type=forking

User=tomcat
Group=tomcat

Environment="JAVA_HOME=/usr/lib/jvm/jdk-17-oracle-x64"
Environment="JAVA_OPTS=-Djava.security.egd=file:///dev/urandom"
Environment="CATALINA_BASE=/opt/tomcat"
Environment="CATALINA_HOME=/opt/tomcat"
Environment="CATALINA_PID=/opt/tomcat/temp/tomcat.pid"
Environment="CATALINA_OPTS=-Xms512M -Xmx1024M -server -XX:+UseParallelGC"

ExecStart=/opt/tomcat/bin/startup.sh
ExecStop=/opt/tomcat/bin/shutdown.sh

[Install]
WantedBy=multi-user.target
Rechargr le deamon service pour prendre en compte le nouveau service :
systemctl daemon-reload
Démarrer Tomcat :
systemctl start tomcat.service
Activer Tomcat pour qu'il redémarre automatiquement à chaque reboot :
systemctl enable tomcat.service
Afficher son statut :
systemctl status tomcat.service
Accéder à l'interface Web via l'adresse DNS fournie :
- http[s]://srv2-vm-[number].sts-sio-caen.info/
- http[s]://srv2-vm-[number].sts-sio-caen.info/manager/
Mise en place CI/CD
gitlab-ci user sur la VM
Sur la VM :
- Créer un utilisateur gitlab-ci
- Faire en sorte qu'il puisse accéder à sudo
- Changer son password : changeMyPassword
- Permettre qu'il puisse s'authentifier en SSH avec login/password
- Redémarrer SSH
- Faire en sorte qu'il n'ait pas besoin de saisir un password en utilisant sudo avec les commandes mv, cp, systemctl
adduser --quiet --shell $SHELL --disabled-password --gecos 'GitlabCI User' gitlab-ci
usermod -a -G sudo gitlab-ci
echo 'gitlab-ci:changeMyPassword' | chpasswd
printf 'Match User gitlab-ci\n\tPasswordAuthentication yes\n' >> /etc/ssh/sshd_config
systemctl restart sshd
echo 'gitlab-ci ALL=(ALL) NOPASSWD: /bin/mv, NOPASSWD: /usr/bin/systemctl, NOPASSWD: /bin/cp' | sudo EDITOR='tee -a' visudo
Variable CI/CD sur Gitlab
Créer une variable dans Gitlab pour stocker le mot de passe de l'utilisateur gitlab-ci qui se connectera en SSH :
Dans Settings-CI/CD, créer la variable CI_USER_PASS :
Configuration du projet Springboot
Modifier pom.xml pour définir le nom du fichier WAR déployé :
    <build>
        <finalName>ssh-deploy</finalName>
    </build>
Vérifiez que le déploiement sera bien fait en WAR :
<packaging>war</packaging>
Configuration Gitlab CI/CD
Créer ou modifier le fichier .gitlab-ci.yml :
stages:
  - build
  - deploy

maven-build:
  image: maven:3.9.5-amazoncorretto-17-debian
  stage: build
  script: "mvn package -B"
  artifacts:
    paths:
      - target/ssh-deploy.war

deploy-master:
  variables:
    HOST: "149.202.94.223"
    PORT: "7839"
    USER: "gitlab-ci"
    WAR: "ssh-deploy.war"
  rules:
    - if: '$CI_COMMIT_BRANCH =~ /^main$/'
  before_script:
    - apt-get update -qq && apt-get install -y -qq sshpass sudo
    - echo "Host= $HOST"
  stage: deploy
  script:
    - sudo whoami  # Vérifiez si sudo est disponible
    - which mv
    - sshpass -V
    - export SSHPASS=$CI_USER_PASS
    - sshpass -e scp -o StrictHostKeyChecking=no -P $PORT target/$WAR $USER@$HOST:/home/$USER
    - sshpass -e ssh -tt -o StrictHostKeyChecking=no -p $PORT $USER@$HOST echo $PATH
    - sshpass -e ssh -tt -o StrictHostKeyChecking=no -p $PORT $USER@$HOST sudo mv /home/$USER/$WAR /opt/tomcat/webapps
    - sshpass -e ssh -tt -o StrictHostKeyChecking=no -p $PORT $USER@$HOST sudo systemctl restart tomcat.service
Il est conseillé de mettre les valeurs HOST, USER et PORT dans des variables Gitlab.
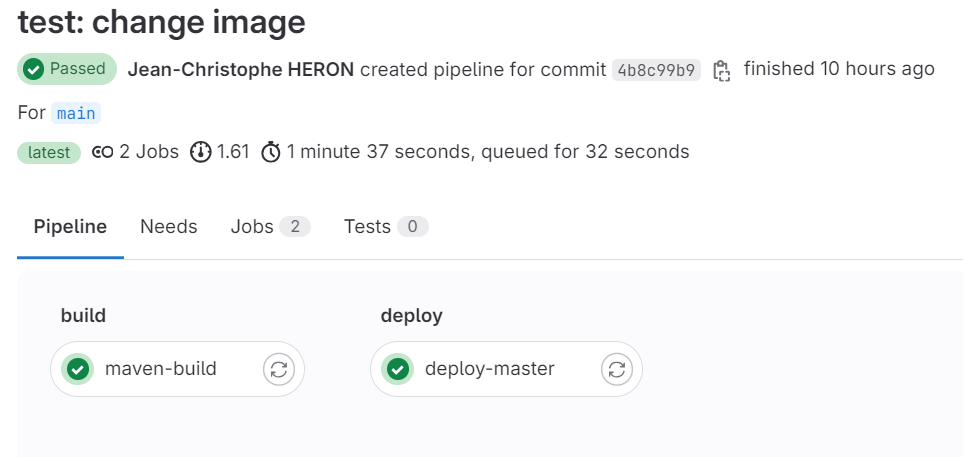
Vérifier que les 2 jobs sont bien lancés sur Gitlab à chaque commit sur la branche main, et que l'application est bien déployée sur le serveur :
Configurations spécifiques dev/prod/test
Profiles
La création de profiles permet de gérer des configurations différentes, et des fichiers de configuration spécifiques à chaque profile.
Ajouter la section profiles suivante au fichier pom.xml
    <profiles>
        <profile>
            <id>dev</id>
            <activation>
                <activeByDefault>true</activeByDefault>
            </activation>
            <properties>
                <activeProfile>dev</activeProfile>
            </properties>
        </profile>
        <profile>
            <id>prod</id>
            <properties>
                <activeProfile>prod</activeProfile>
            </properties>
        </profile>
        <profile>
            <id>test</id>
            <properties>
                <activeProfile>test</activeProfile>
            </properties>
        </profile>
    </profiles>
Configurations
Il est ensuite possible de créer des fichiers de configuration spécifiques à chaque profile, en plus du fichier de configuration de base application.properties.
Configuration générale : application.properties
spring.profiles.active=@activeProfile@

# Mustache Template engine
spring.mustache.prefix=classpath:/templates/
spring.mustache.suffix=.html

# H2 Database + JPA
spring.datasource.username=sa
spring.datasource.password=
spring.datasource.driverClassName=org.h2.Driver
spring.jpa.hibernate.ddl-auto=update
spring.jpa.properties.hibernate.dialect=org.hibernate.dialect.H2Dialect
spring.jpa.properties.hibernate.globally_quoted_identifiers=true

spring.h2.console.enabled=true
spring.h2.console.settings.web-allow-others=true
spring.h2.console.path=/h2-console
Configuration spécifique au dev
spring.datasource.url=jdbc:h2:file:./data/paris-2024;DB_CLOSE_ON_EXIT=FALSE
spring.jpa.show-sql=true
spring.jpa.properties.hibernate.format_sql=true

servlet.context.path=/
Configuration spécifique à la prod
- La base de données H2 est localisée en dehors du dossier du projet (pour ne pas être modifiée par les commits)
- Les Logs SQL sont désactivés
La base de données (le fichier db) pourra être déposée dans le dossier préalablement créé sur la VM : /data/h2/ via WinSCP.
spring.datasource.url=jdbc:h2:file:/data/h2/paris-2024/data;DB_CLOSE_ON_EXIT=FALSE
spring.jpa.show-sql=false
spring.jpa.properties.hibernate.format_sql=false

servlet.context.path=/paris-2024
Configuration spécifique aux tests
spring.datasource.url=jdbc:h2:file:/home/runner/work/myparis/paris-2024/target/data;DB_CLOSE_ON_EXIT=FALSE
spring.jpa.show-sql=true
spring.jpa.properties.hibernate.format_sql=true

servlet.context.path=/
Prise en compte dans .gitlab-ci.yml
Génération du package en production
  stage: build
  script: "mvn clean package -P prod -DskipTests=true"
Génération du package pour les tests
  stage: test
  script: "mvn --batch-mode --update-snapshots verify -P test -DskipTests=false"


